How to Make a Cheese and Olive Tray

If you don't feel confident in the kitchen, the charcuterie board might just become your new best friend! There are no cooking skills required whatsoever and even the least creative person can put together an artful masterpiece of meat and cheese! You can make them large enough to feed an army or small enough for a date night with your other half.
Below I'll share my tips and tricks for making a delicious cheese board along with step-by-step instructions with photos! THIS IS A FOOL PROOF RECIPE!
Cheeseboard Rules
- A cheeseboard (also sometimes called a charcuterie board) is typically comprised of a few kinds of cheeses, a few kinds of meats, and some crispy crackers along with a few other accompaniments - think: olives, pesto, pickles, potato salad, roasted nuts, fresh or dried fruit, jams, spreads, etc. My Herb and Garlic Marinated Feta is a great way to add something extra to a cheeseboard.
- When it comes to cheese boards there is only one rule I follow - variety and randomness are paramount. I like to cut all the cheeses in different shapes and arrange my meats in different shapes as well. I pile everything onto a large cutting board or serving platter - some in neat rows, others in piles, some are fanned around dishes, and others are rolled into little cigar shapes. I never plan where I'm going to put anything. I just let it happen organically.
- Don't worry about making your cheeseboard look like a Food & Wine magazine photoshoot! Just make sure you use delicious, high-quality ingredients and it will turn out beautifully every time!
Cheese
My favorite cheeses for my cheese board are:
- provolone
- fresh mozzarella
- Fontina
- Gorgonzola
- smoked mozzarella
- Parmesan or Asiago
- brie
- goat cheese
- aged cheddar
- You certainly don't have to include all the cheeses listed above on your board - you could keep it to just 3 or 4. As a general rule of thumb I like to include a creamy cheese (brie), a firm cheese (Parmesan), a soft cheese (goat cheese) and a tangy cheese (Gorgonzola or blue cheese). Using this guideline is a good way to ensure that you've got a variety of cheeses with different textures and shapes.
- I also like my cheese to have a variety of shapes and sizes. I'll leave one kind of cheese as a wedge, cut one kind into cubes and cut the others into slices.A little tip for getting the best cracker-size slices of cheese: Buy the pre-sliced cheese (like for sandwiches) and cut each square into 4 smaller squares. This will give you perfect, even slices of cheese every single time! This is my biggest time saver when it comes to assembling a charcuterie board!
- But don't get hung up following these blueprints exactly. I usually think about the taste preferences of my guests (are they adventurous or plain Jane?) and try to include things that I know they will like, and also things that they maybe haven't tried before.
Meat
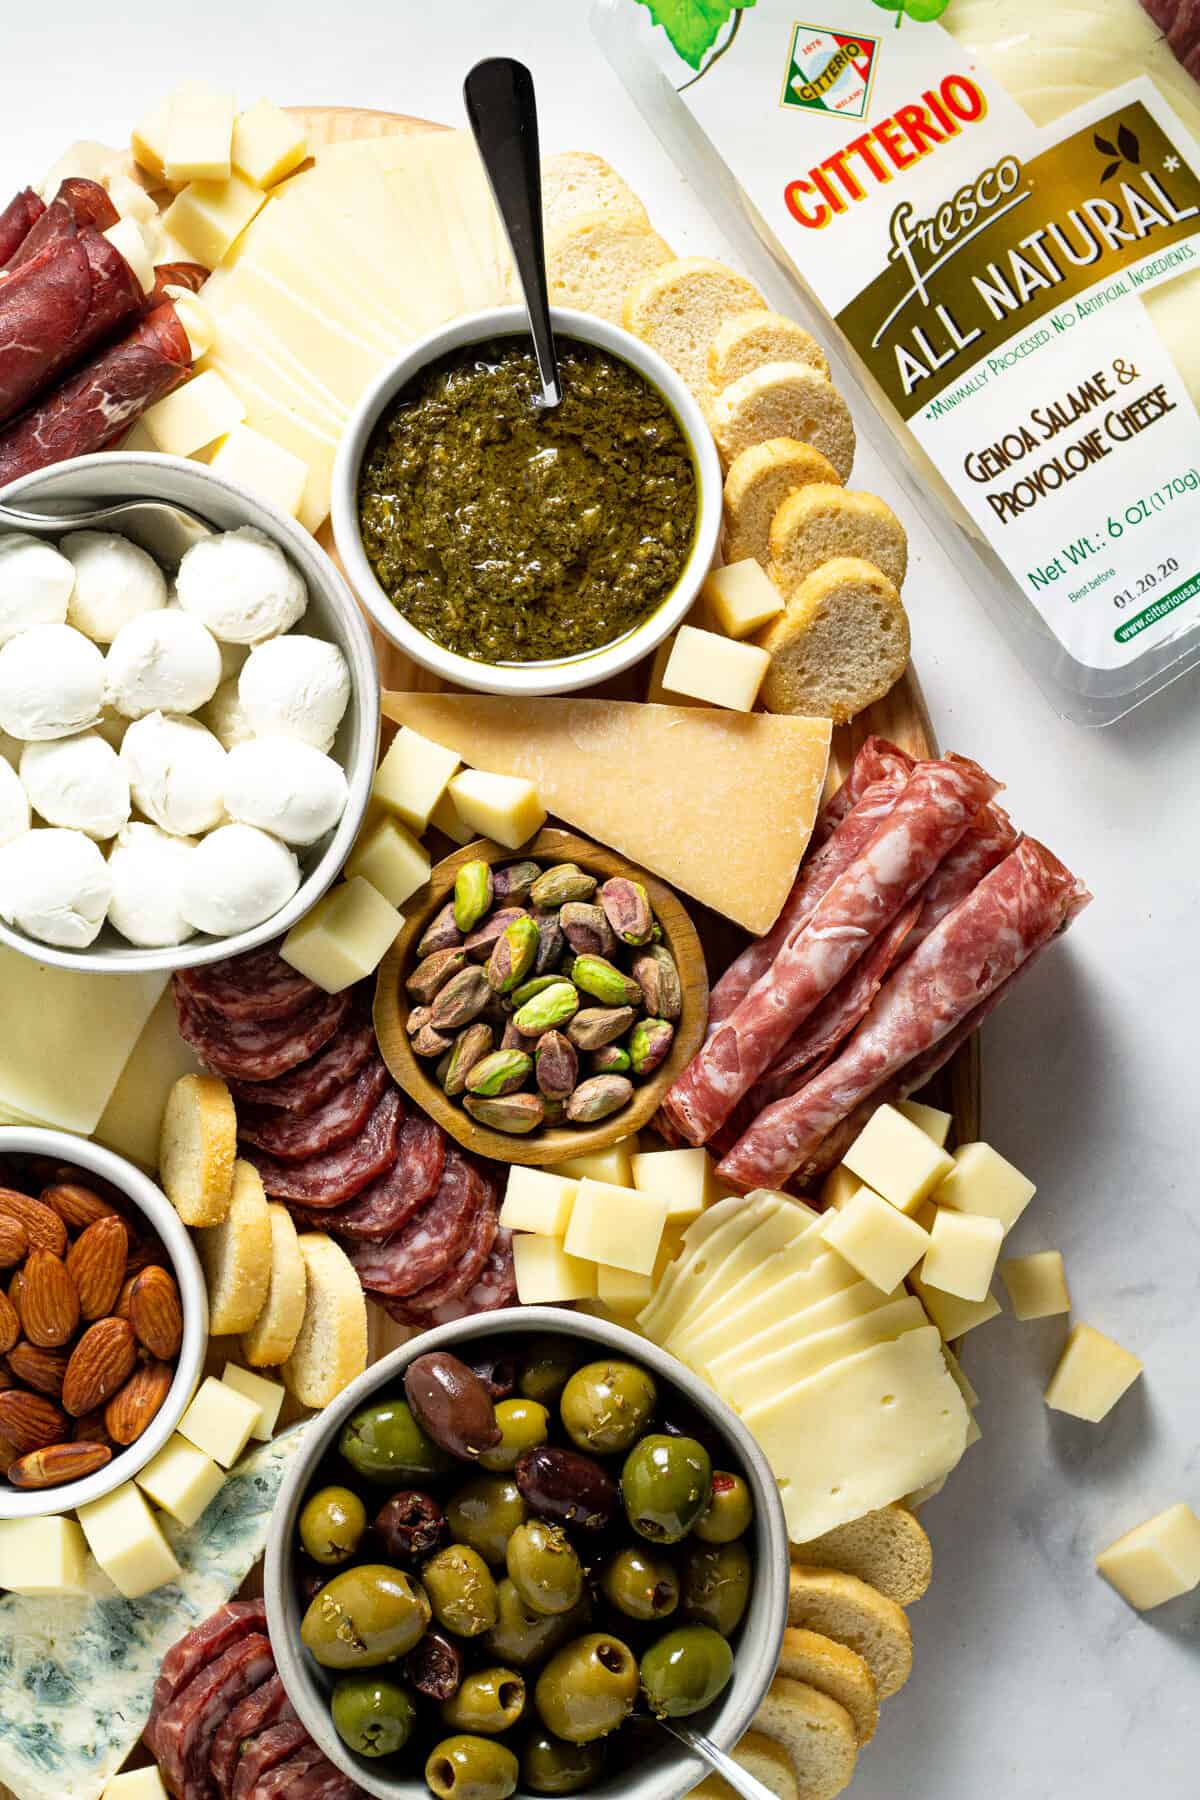
Similar to the cheese guideline, you'll want to add variety to the charcuterie board by using a few different kinds of meats. Try to include smoked or cured meats. Sliced deli meat is a great option too!
My favorite meats for my cheese board are:
- salami
- prosciutto
- sliced deli ham
- I like to use salami and prosciutto on all my cheese boards. And if I have some in the fridge, I'll use some sliced deli meat too! This is a great time to try that unique sausage you've seen at the specialty grocery store or that mortadella you've been eyeing.
- Again, I like to switch up the shapes and sizes of the meat on the cheeseboard as well. I look for salami that is pre-sliced and then roll up the prosciutto into little cigars. This gives a nice visual appeal and also keeps your guests coming back to try more!
Accompaniments
My favorite add-ons are:
- Easy Marinated Mozzarella
- Whipped Feta with Chickpeas
- pickles
- pistachios
- almonds
- pesto
- olives
- Before you go to the store to get ingredients for your cheese board, check your fridge first! The best part about making a charcuterie is that it's a great way to use up those odds and ends you have in your fridge or cupboard! Y'know, the ten green olives at the bottom of the jar; the last of the Dijon mustard; that handful of roasted pecans you didn't end up using in your favorite cookie recipe. The wider the variety, the more beautiful the cheese plate.
- I sometimes like to add some fresh fruit or sliced vegetables too since all the meat and cheese can really be quite heavy on the palate. Sliced apples or red pepper are a great way to lighten up a delicious cheese board!
Best Board
You can use a:
- rimmed baking sheet
- old cutting board
- large serving platter
- round drink tray
I love a regular ol' cutting board as much as the next gal, but for my cheese boards I like to use this beautiful oval cutting board/serving platter .
Instructions
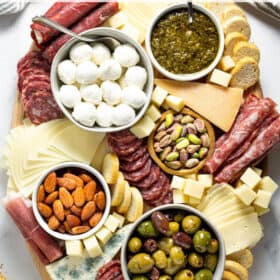
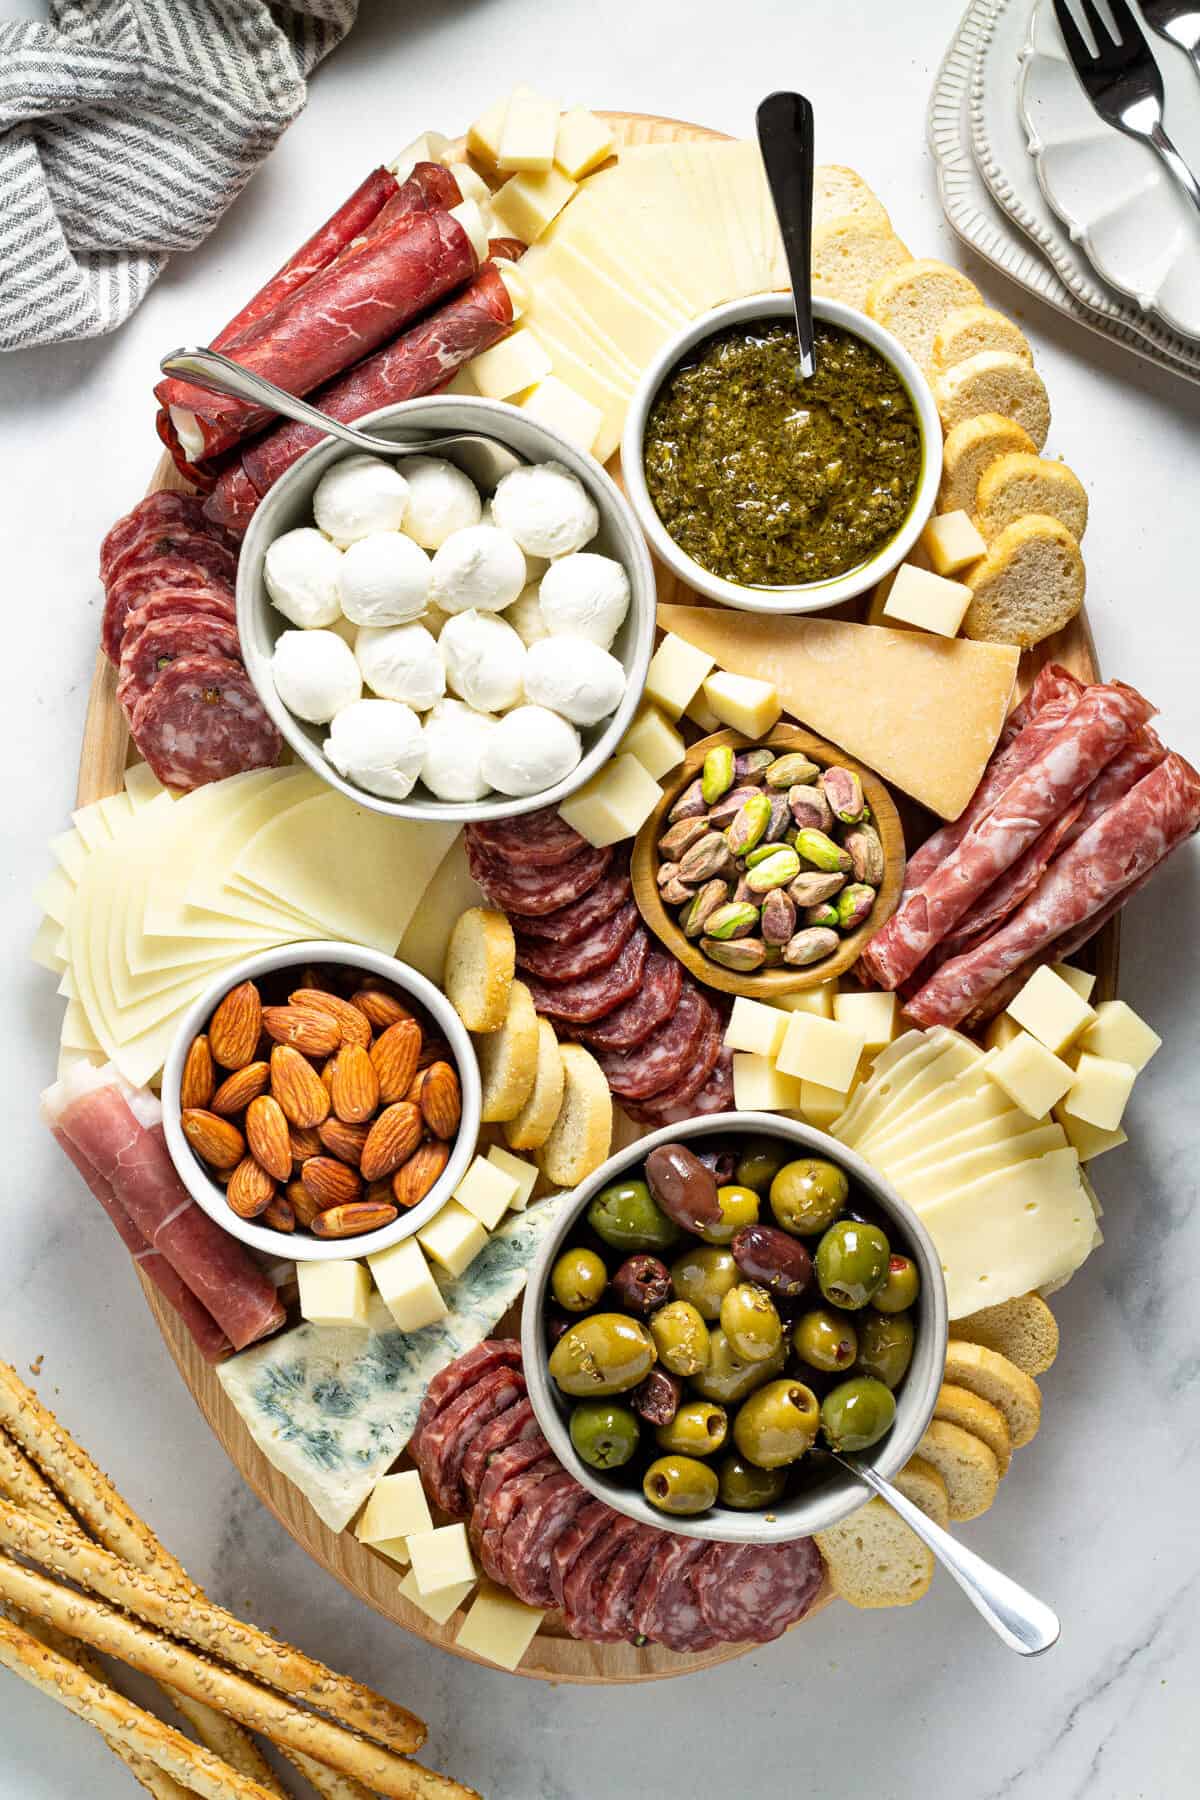
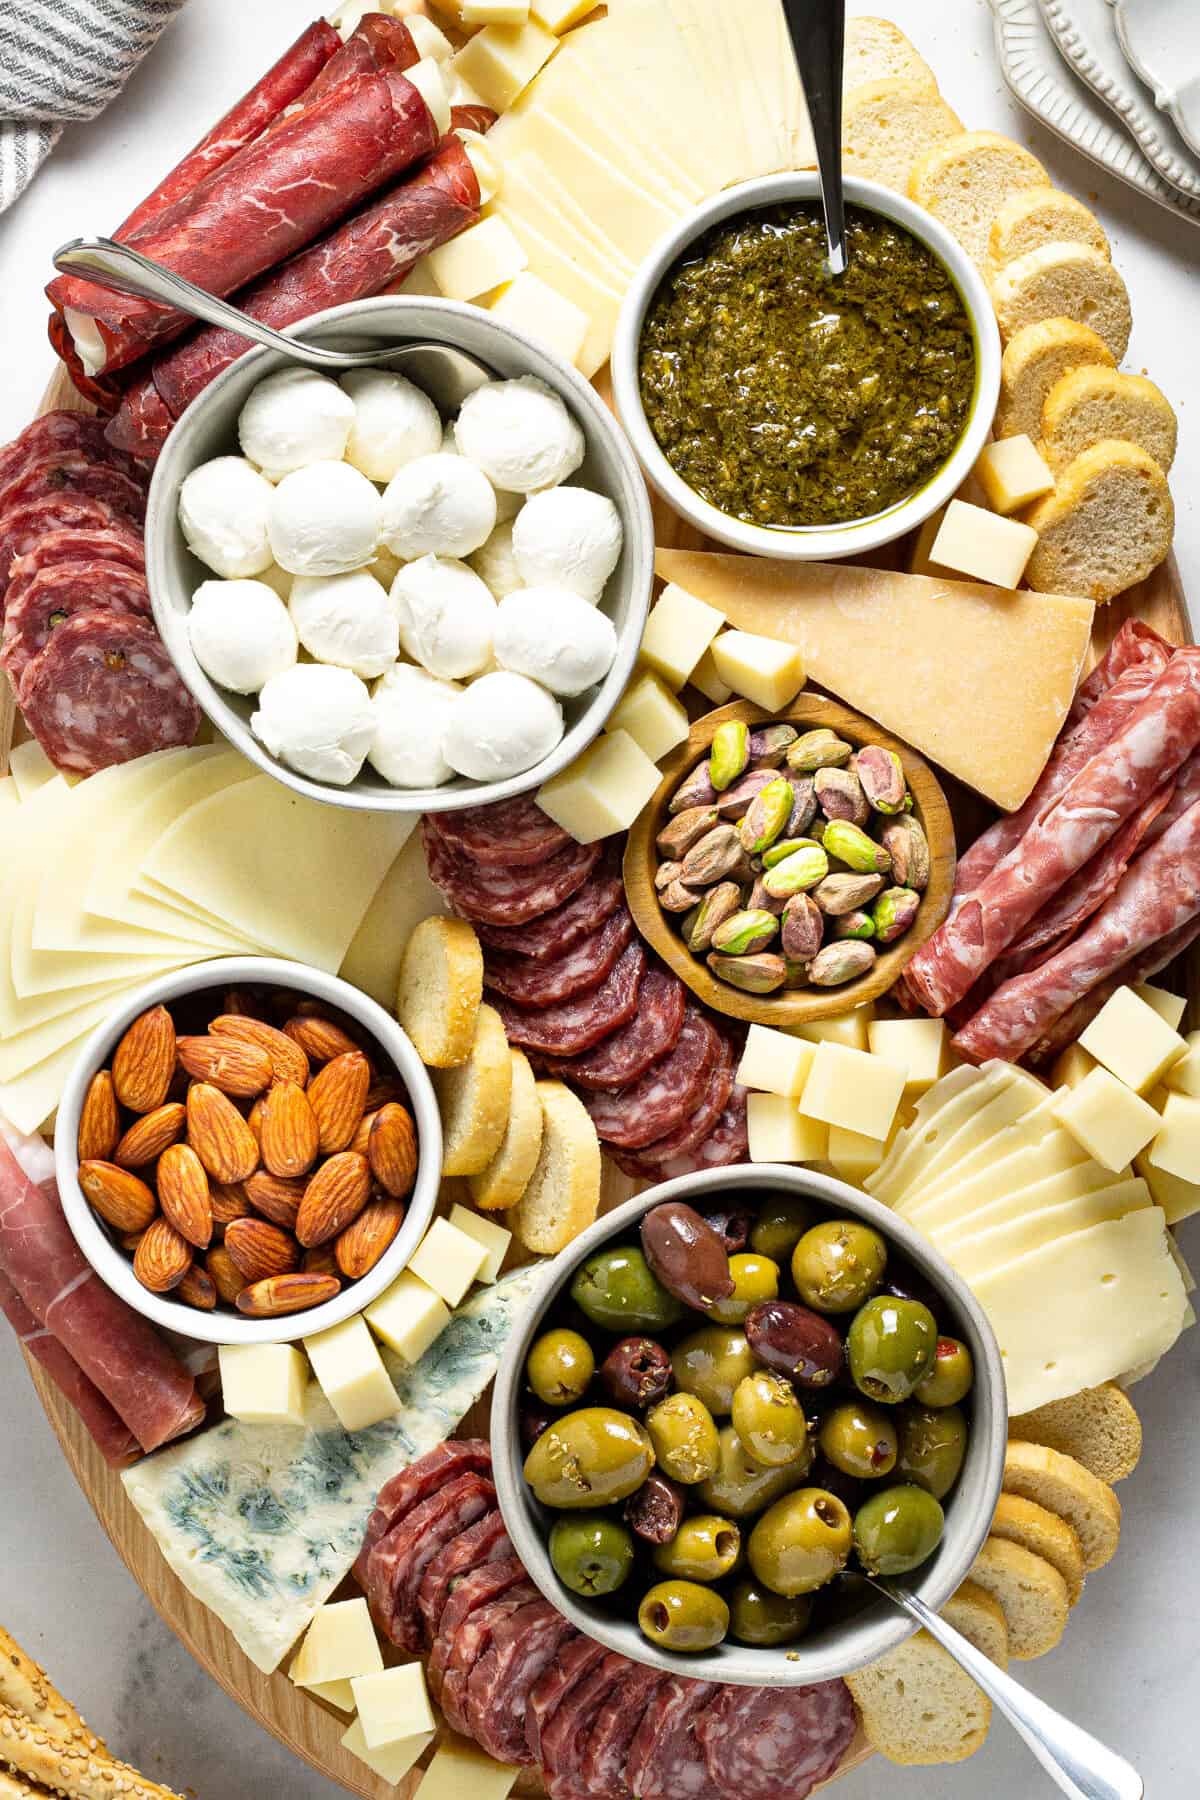
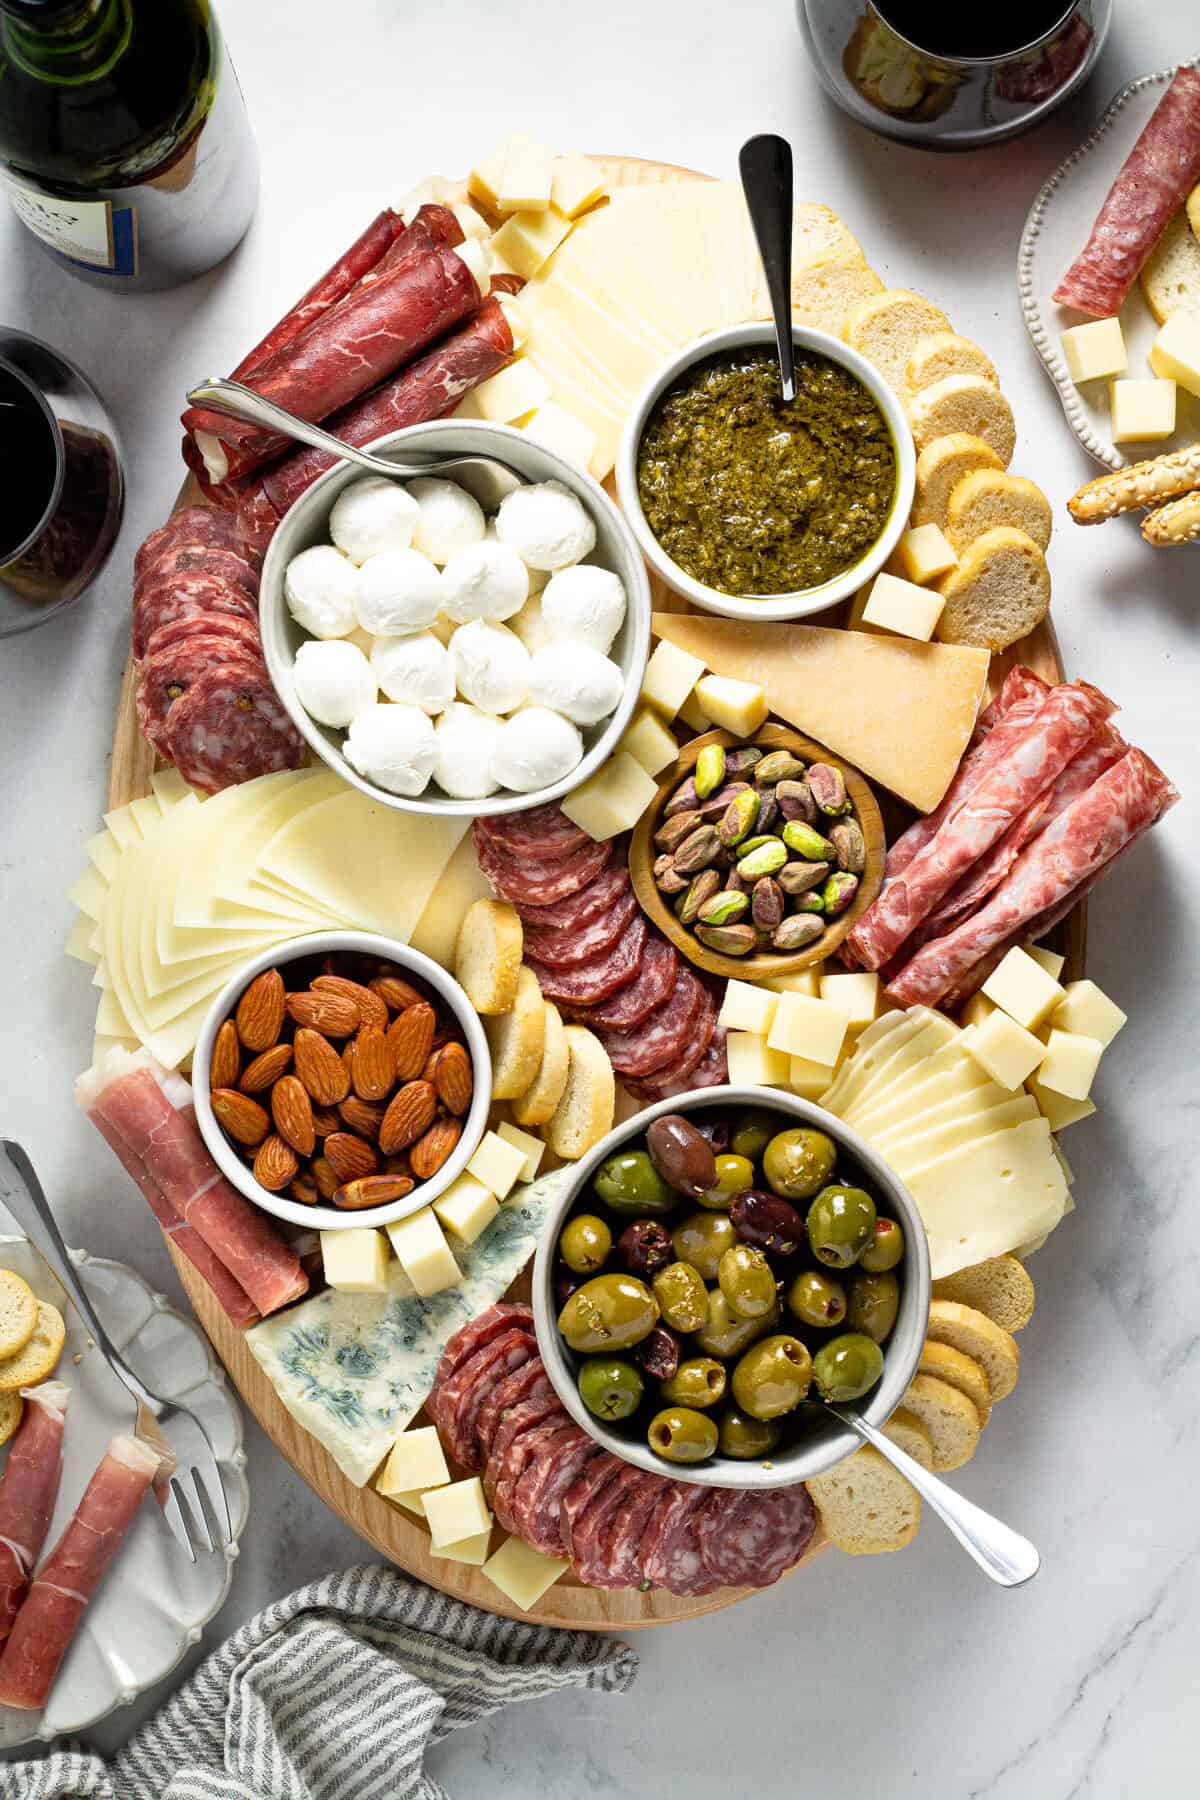
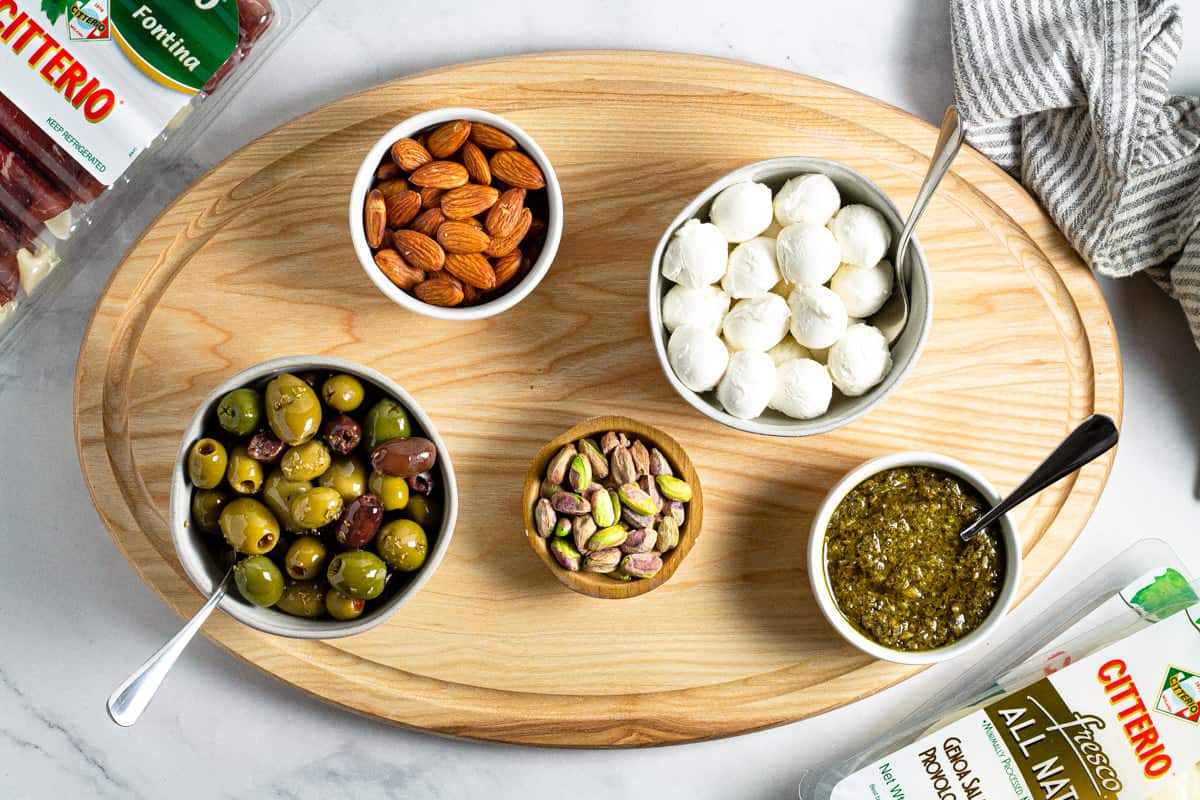
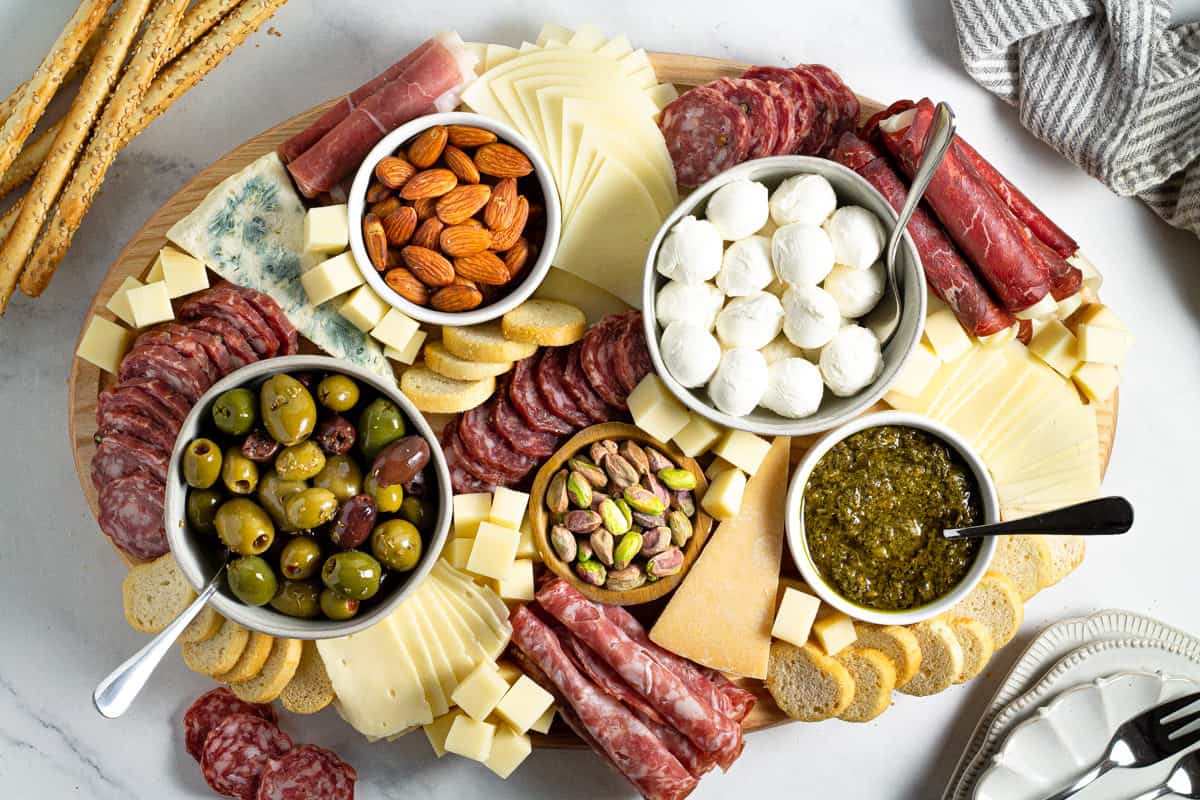
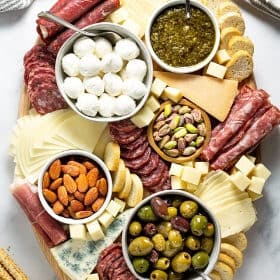
#1 - Start with your anchors (anything in a small bowl or cute ramekin ) - nuts, olives, pesto and fresh mozzarella are my favorites. These bowls will act as your anchors. They'll give you a good starting point to add more things to your cheese board.
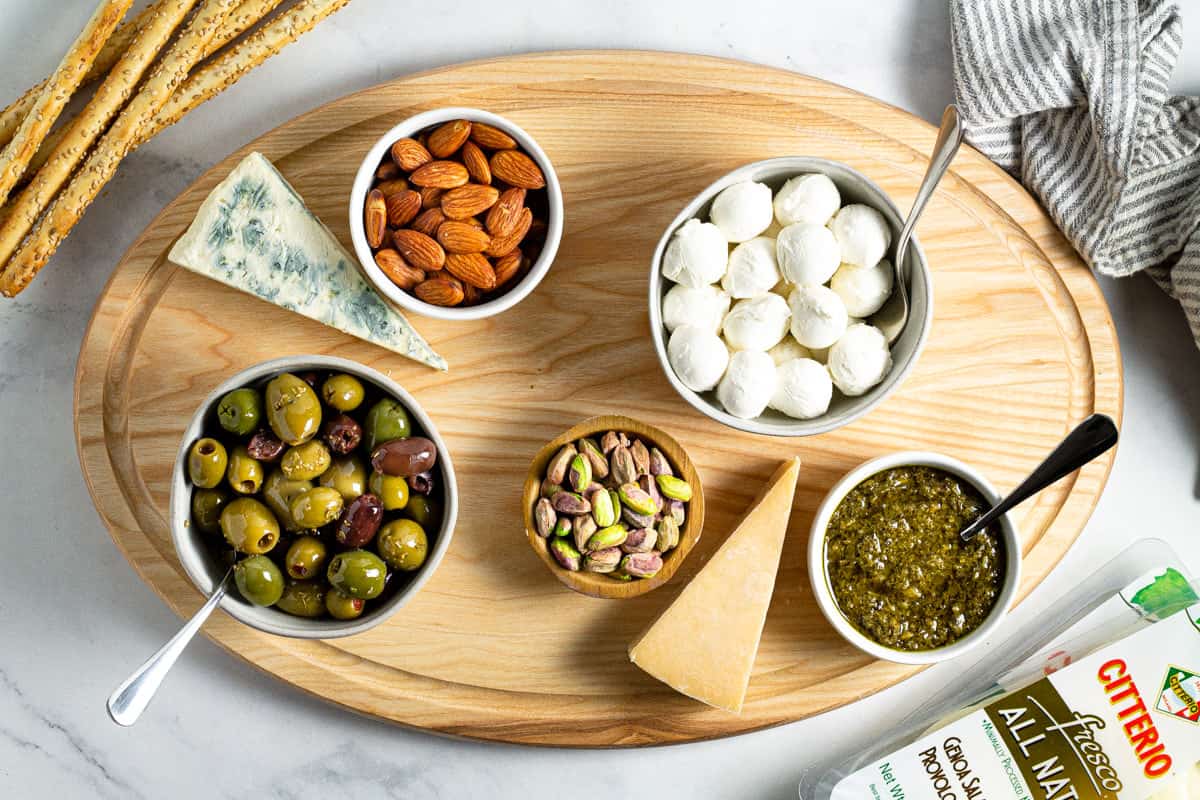
#2 - Then add any large wedges or blocks of cheese. Again these large pieces of cheese will act as the anchors that you'll place everything else around.
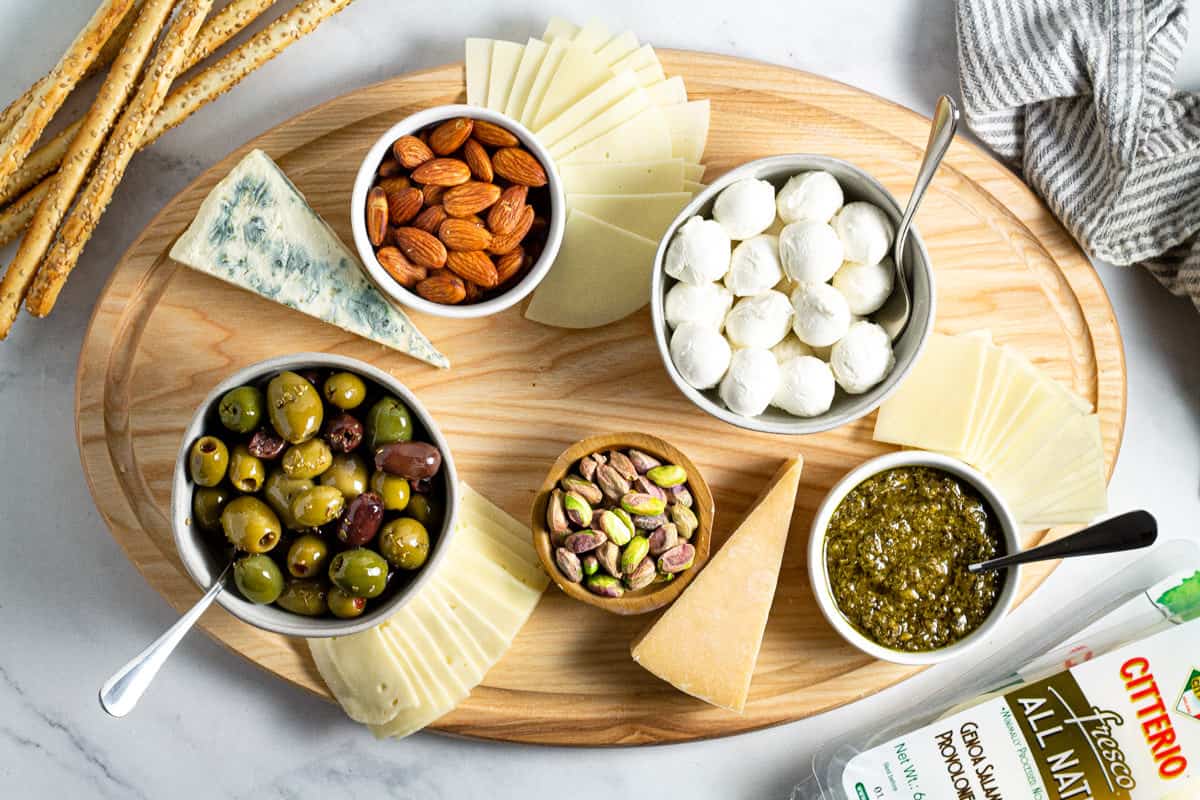
#3 - Next add your sliced cheese. Fan the slices out around your anchors.
#4 - Then add your sliced meats and crispy crackers or bread. Again, fanning them out around the anchors.
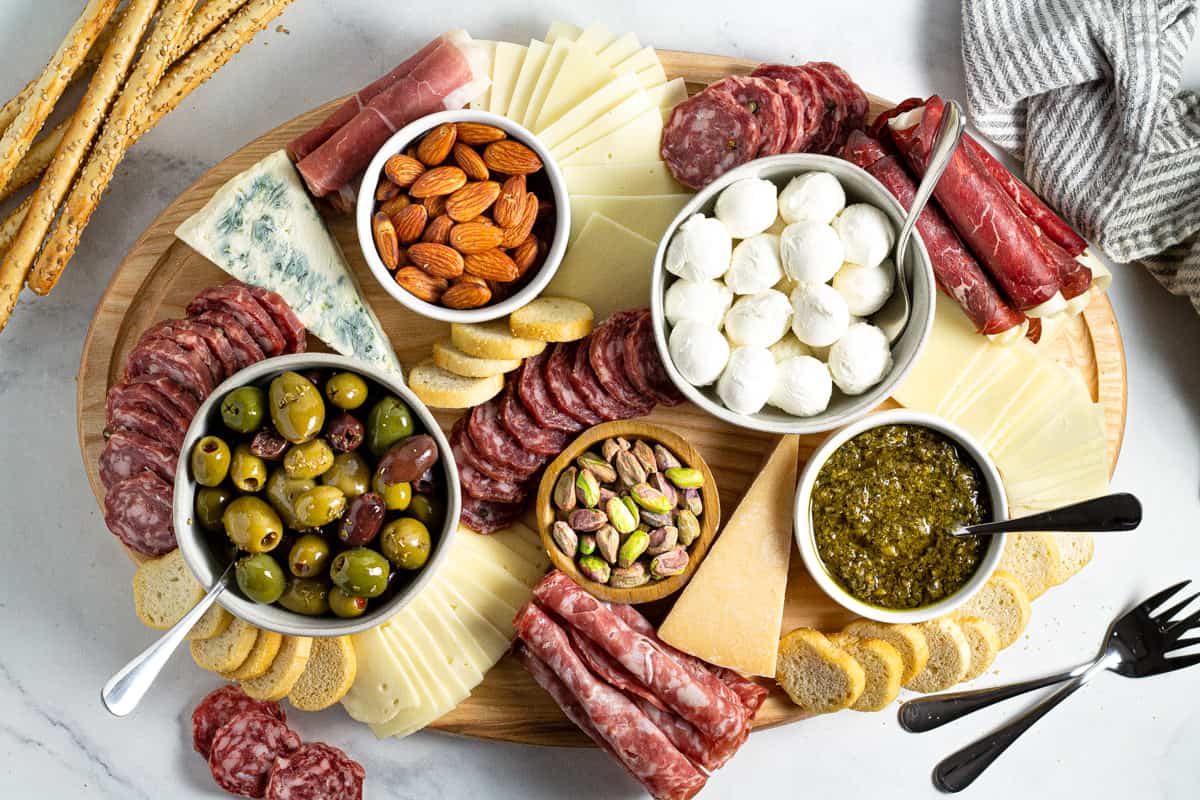
#5 - Next add your cubes of cheese, filling in the smaller areas of the cheese board. Lastly, pour yourself and your guests a glass of wine and head for the patio to enjoy this delicious appetizer!
Tips
- Plan on about 3-5 ounces of meat/cheese per person. When selecting your meats and cheeses, this will give you a ballpark idea of how much food you'll need. Of course this will vary depending on the time of day you're serving it, if a large meal will follow or if you're feeding mostly men or women.
- When assembling the charcuterie board, start with the bowls and jars first. It's easiest to assemble your cheese board by placing the bowls (of pickles or almonds) down first. Then place your meats and cheeses around them. If you try to add the bowls towards the end, chances are good you may not have enough room for them.
- Don't stress about the presentation. Don't worry too much about making everything look perfect. In my opinion, the most beautiful cheese boards are those that are asymmetrical and have varying colors, textures and heights. Go for contrast and dimension instead of making it look picture perfect.
More Easy Appetizers
-
Creamy Baked Crab Dip
-
30 Minute Garlic Bread Pizza
-
Roasted Delicata Squash
-
The Easiest Loaded Fries
Making a Simple Cheese Board
Fool proof, step-by-step instructions and pro tips to help you make the very best charcuterie board!
- Prep Time: 20 minutes
- Cook Time: 0 minutes
- Total Time: 20 minutes
- Yield: 16-20 servings 1x
- Category: Appetizer
- Method: No Bake
- Cuisine: American
- 1 cup olives
- ½ cup almonds
- ½ cup fresh basil pesto
- ½ cup shelled pistachios
- 8 oz. fresh mozzarella pearls
- 5 oz. wedge Gorgonzola
- 5 oz. wedge Asiago
- 12 oz. salami rolled into cigar shapes
- 4 oz. prosciutto rolled into cigar shapes
- 9 oz. soppressata, sliced
- 12 oz. sliced cheese (cheddar, pepperjack, fontina, provolone), cut into squares
- 8 oz. smoked cheese (mozzarella, Gouda, cheddar), cubed
- 12 oz. assorted crackers or sliced baguette
- Arrange olives, almonds, pesto, pistachios, and fresh mozzarella on your cheese board in small bowls or ramekins. Check out the photo and step-by-step instructions above to see how I arranged them.
- Then add sliced cheeses, fanning them around the small bowls or ramekins.
- Then add sliced meats, fanning them around the bowls as well.
- Then add crackers or bread.
- Next add cubed cheese, filling in any small openings on the cheeseboard.
- Serve with assorted crispy crackers on the side or sliced baguette.
- Pour yourself and your guests a glass of wine and head for the patio to enjoy this delicious appetizer!
Notes
- Plan on about 3-5 ounces of meat/cheese per person. When selecting your meats and cheeses, this will give you a ballpark idea of how much food you'll need. Of course, this will vary depending on the time of day you're serving it, if a large meal will follow or if you're feeding mostly men or women.
- When assembling the charcuterie board, start with the bowls and jars first. It's easiest to assemble your cheeseboard by placing the bowls (of pickles or almonds) down first. Then place your meats and cheeses around them. If you try to add the bowls towards the end, chances are good you may not have enough room for them.
- Don't stress about the presentation. Don't worry too much about making everything look perfect. In my opinion, the most beautiful cheeseboards are those that are asymmetrical and have varying colors, textures, and heights. Go for contrast and dimension instead of making it look picture perfect.
Keywords: cheese board, cheese plate, meat and cheese, lunchables, deli tray
This recipe was originally published in November of 2018. It was updated in November of 2019 to include process shots and detailed step-by-step instructions to help you make the perfect cheese board every single time!
Reader Interactions
How to Make a Cheese and Olive Tray
Source: https://midwestfoodieblog.com/charcuterie-board-making-101/